Photo Frame
 Wall Art & Paintings
 Zebra Blinds
 Roller Blinds
 Honeycomb Blinds
 Customized Blackout Roller Blinds
 Custom Size Curtains
 Feng Shui & Vastu
 Modern shapes
 Vinyl Flooring
 Wooden Flooring
 Carpet
 Carpet Tile
 Floor Vase
 Mix Design Vases
 Modern Vases
 Showpieces

How To Measure Windows For Window Film
Measure Your Windows: The Tools
You don’t need too many tools; just three simple ones: a measuring tape, a pen or pencil, and something to write on. If your windows are large, you could also get the help of a family member or friend to assist you. (Just don’t call them tools.)
- Tape measure
- Paper or pencil
- Pad or paper
- Friend or family member
7 Tips For Measuring Windows For Window Film
Measuring your windows might be the first time that you really get a close look at their condition and health. While you are measuring, look for any cracks or and other window damage. These are the things that our team looks for when they provide a window film estimate. Here are 7 tips to keep in mind when measuring your windows.
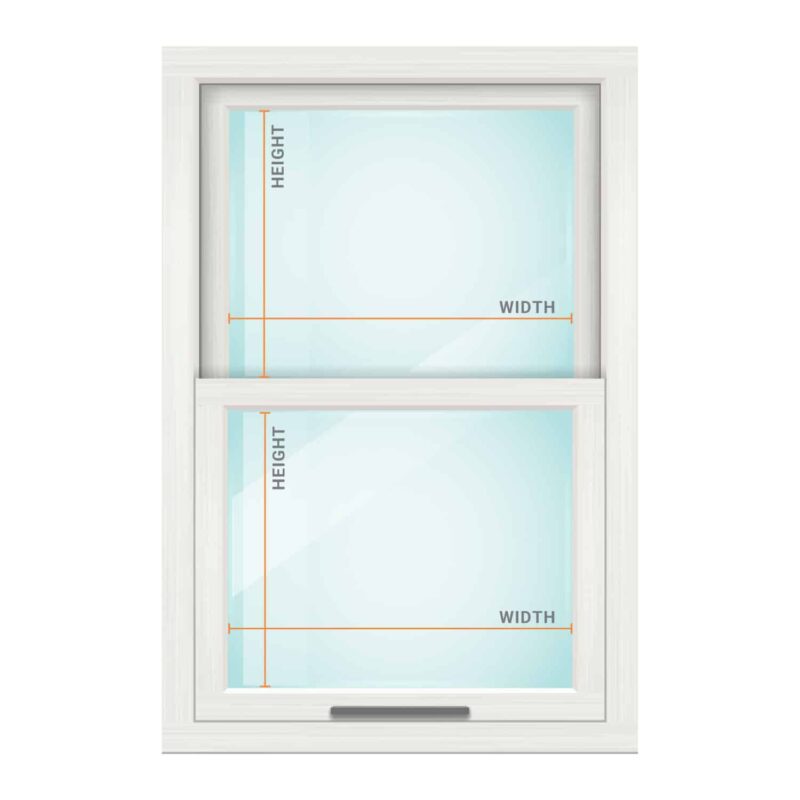
- Measure the glass on the inside of the window. This is the area where window film will be applied. Don’t include the frame or molding in your final measurements.
- Measure from left to right will give you the width of the glass.
- Measure from top to bottom will give you the height of the glass.
- Use the right tape measure. A flexible one is the best choice.
- For large windows, ask a friend or family member to help you. Measuring a large window by yourself is challenging and you’ll get a more accurate measurement with an extra set of hands.
- Be sure to double-check all measurements. Measure twice and cut once: that’s our motto.
- Keep accurate records. Write your measurements down and be sure to accurately label each window. Many homeowners find it helpful to draw a square, rectangle, or circle, labeling each and adding measurements.
Before you get started…
Make a wetting solution.
Wetting solution is the secret ingredient to a smooth, seamless installation. Make a solution by adding 8-10 drops of a mild, non-moisturizing dish detergent (Dawn or Joy; do not use hand soap) to a 32-oz. spray bottle filled with clean water (adjust ratio for smaller or larger bottles). More soap may be needed when applying film to acrylic surfaces. Mix well.
Make sure it’s smooth.
To ensure the surface is completely clean and smooth before installation, spray the glass with the soapy water mixture and drag a single-edge razor across the surface. If you hear a clicking sound, there is something on the surface that will prevent full adhesion. Use a glass-safe scrub pad to remove the debris.
Make a workspace.
Give yourself enough space to work. You will need enough flat surface to lay out the film for measuring, cutting, marking and prep. Do not run a fan near the film or glass surface during installation. This can cause dust and debris to blow onto your film and become trapped.
Steps
Step 1: Measure, Cut and Clean
Carefully measure the height and width of the glass surface. Cut the film to the dimensions, leaving an extra ½ inch to 1 inch around all sides. You’ll be able to trim the edges down to size in the final step. You may use the paper liner on the back of the film to mark cut points; this will not damage the film. If you’re unsure about measuring, make a paper template of your window and use it to measure and cut your film. Thoroughly clean the surface of the glass to remove any trace of dust, grime and grease. Use low-lint towels or microfiber cloths to clean the surface, as lint left on the glass can stick under film.
Step 2: Peel and Prep
Lay the film on a clean, flat surface with the liner facing up. Slowly peel back the liner, wetting the adhesive side of the film very thoroughly as you peel down. If you can’t separate the liner from the film, place a piece of scotch tape on both sides of the sheet, fold the tape over to create tabs, and use the tabs to separate the two sides. If you are working with a large piece of film, it is helpful for two people to work together. After you remove the liner, rinse and dip fingers in water before handling the film. Wet fingers will prevent fingerprints on the adhesive surface.
Step 3: Get It Wet
Thoroughly spray and soak the glass surface AND the adhesive side of the film with the water mixture. Wetter is better! There is no such thing as too much water. The water will allow you to easily apply and reposition the film before you squeegee—and any excess water will evaporate as the film fully adheres.
Step 4: Apply and Smooth
Pick up the film by the top corners, keeping it straight and level. Place the wet film onto the wet surface, keeping the top edge level but letting the film hang over the edges of the frame on all sides. Move, slide and reposition the film as needed. The water should allow it to float and flow easily. Wet the outside of the film with the spray, then slide a squeegee over the wet film to smooth out and press the film against the glass. Squeegee from the center moving out, pushing bubbles and wrinkles out as you go.
Step 5: Trim and Finish
Double check that the film is flat and smooth. Locate the hard card and razor that were included with your film. If any bubbles remain, use the hard card to push them towards the edge. Then, in one smooth, continuous motion, trim the excess film from the edges using the hard card and a razor knife. Once the film is trimmed, wrap the hard card in a paper towel and use it to push any remaining bubbles and water to the outside edge. The film will completely dry and fully adhere within a few days.